概述
使用 websocket 能够长时间维持前端和后端的连接,方便前后端进行消息推送。在一些后端主动推送消息的场景中经常使用,比如后端主动推送异步处理的结果,主动推送收到的报警信息等。这篇文章介绍了使用 springboot 实现 websocket 服务端,与前端进行消息推送。
什么是 websocket
websocket 是 html5 开始提供的一种在单个 TCP 连接上进行全双工通讯的协议。websocket 使得客户端和服务器之间的数据交换变得更加简单,允许服务端主动向客户端推动数据。在 websocket api 中,浏览器和服务器只需要完成以此握手,两者之间就直接可以创建持久性的连接,并进行双向数据传输。
代码实现
下述代码示例使用 springboot 实现了 websocket 服务端,提供了访问页面,打开多个页面即可实现简易聊天室功能。
后端
创建 springboot 工程并引入依赖
使用喜欢的方式创建一个 springboot 工程,引入 springboot 提供的 web 和 websocket 的 starter 依赖。如下示例是使用 maven 创建的项目,pom.xml 信息如下:
1
2
3
4
5
6
7
8
9
10
11
12
13
14
15
16
17
18
19
20
21
22
23
24
25
26
27
28
29
30
31
32
33
34
35
36
37
38
39
40
41
42
43
44
45
46
47
48
49
| <?xml version="1.0" encoding="UTF-8"?>
<project xmlns="http://maven.apache.org/POM/4.0.0" xmlns:xsi="http://www.w3.org/2001/XMLSchema-instance"
xsi:schemaLocation="http://maven.apache.org/POM/4.0.0 https://maven.apache.org/xsd/maven-4.0.0.xsd">
<modelVersion>4.0.0</modelVersion>
<parent>
<groupId>org.springframework.boot</groupId>
<artifactId>spring-boot-starter-parent</artifactId>
<version>2.4.1</version>
<relativePath/>
</parent>
<groupId>xyz.wqf</groupId>
<artifactId>websocketdemo</artifactId>
<version>0.0.1-SNAPSHOT</version>
<name>websocketdemo</name>
<description>Demo project for Spring Boot</description>
<properties>
<java.version>1.8</java.version>
</properties>
<dependencies>
<dependency>
<groupId>org.springframework.boot</groupId>
<artifactId>spring-boot-starter-web</artifactId>
</dependency>
<dependency>
<groupId>org.springframework.boot</groupId>
<artifactId>spring-boot-starter-websocket</artifactId>
</dependency>
<dependency>
<groupId>org.springframework.boot</groupId>
<artifactId>spring-boot-starter-test</artifactId>
<scope>test</scope>
</dependency>
</dependencies>
<build>
<plugins>
<plugin>
<groupId>org.springframework.boot</groupId>
<artifactId>spring-boot-maven-plugin</artifactId>
</plugin>
</plugins>
</build>
</project>
|
websocket 配置
创建一个配置类 WebsocketConfig.java ,实现 WebSocketMessageBrokerConfigurer 接口,然后重写 void registerStompEndpoints(StompEndpointRegistry) 与 void configureMessageBroker(MessageBrokerRegistry) 方法。
注解说明:
@Configuration 注解标识这是一个配置类
@EnableWebSocketMessageBroker 启用 websocket 功能
1
2
3
4
5
6
7
8
9
10
11
12
13
14
15
16
17
18
19
20
21
22
23
| package xyz.wqf.websocketdemo.config;
import org.springframework.context.annotation.Configuration;
import org.springframework.messaging.simp.config.MessageBrokerRegistry;
import org.springframework.web.socket.config.annotation.EnableWebSocketMessageBroker;
import org.springframework.web.socket.config.annotation.StompEndpointRegistry;
import org.springframework.web.socket.config.annotation.WebSocketMessageBrokerConfigurer;
@Configuration
@EnableWebSocketMessageBroker
public class WebsocketConfig implements WebSocketMessageBrokerConfigurer {
@Override
public void configureMessageBroker(MessageBrokerRegistry config) {
config.enableSimpleBroker("/topic");
config.setApplicationDestinationPrefixes("/app");
}
@Override
public void registerStompEndpoints(StompEndpointRegistry registry) {
registry.addEndpoint("/websocket/tracker")
.withSockJS();
}
}
|
消息处理控制器类
创建一个 Spring 处理器,用来处理前端发送的消息,前端往 @MessageMapping 指定的地址发送消息,订阅 @SendTo 指定的消息地址,即可收到后端处理完发送的消息。注意,这里的接收消息和回复消息都可以使用 springboot 自动完成的对象的序列化处理。这里消息处理后的回复是异步的,后台可以完成很多处理逻辑后再返回结果。
注解说明:
@Controller 标识这是一个 spring 控制器@MessageMapping 指定接收消息的映射地址,前端连接 websocket 后往这个地址发送消息,使用时需要加上配置的前缀,完整地址为 /app/msg@SendTo 指定后台处理完成后推送的目标地址,前端可订阅这个地址接收回复
MyMessageCtrl.java :
1
2
3
4
5
6
7
8
9
10
11
12
13
14
15
16
17
18
19
| package xyz.wqf.websocketdemo.web.websocket.ctrl;
import org.springframework.messaging.handler.annotation.MessageMapping;
import org.springframework.messaging.handler.annotation.SendTo;
import org.springframework.stereotype.Controller;
import xyz.wqf.websocketdemo.web.websocket.dto.MsgDTO;
import xyz.wqf.websocketdemo.web.websocket.dto.MsgResponseDTO;
@Controller
public class MyMessageCtrl {
@MessageMapping("/msg")
@SendTo("/topic/response")
public MsgResponseDTO sendMsg(MsgDTO msg){
return new MsgResponseDTO(String.format("%s say: %s", msg.getName(), msg.getMsg()));
}
}
|
MsgDTO.java :
1
2
3
4
5
6
7
8
9
10
11
12
13
14
15
16
17
18
19
20
21
22
| package xyz.wqf.websocketdemo.web.websocket.dto;
public class MsgDTO {
private String name;
private String msg;
public String getName() {
return name;
}
public void setName(String name) {
this.name = name;
}
public String getMsg() {
return msg;
}
public void setMsg(String msg) {
this.msg = msg;
}
}
|
MsgResponseDTO.java :
1
2
3
4
5
6
7
8
9
10
11
12
13
14
15
16
17
18
19
20
| package xyz.wqf.websocketdemo.web.websocket.dto;
public class MsgResponseDTO {
private String content;
public MsgResponseDTO() {
}
public MsgResponseDTO(String content) {
this.content = content;
}
public String getContent() {
return content;
}
public void setContent(String content) {
this.content = content;
}
}
|
前端
在项目 main 目录下创建 webapp 目录,新建 index.html 文件,引入了 SockJS 和 STOMP 库,使用 STOMP 与服务端建立 websocket 通信。
代码说明:
connect() 函数使用 SockJS 和 stomp.js 打开与后端 /websocket/tracker 的连接,这个地址是后端开启的等待连接的地址。连接成功后,订阅 /topic/response 消息通道,服务端将把消息推送到这个地址。收到后台消息推送后,前端将消息展示出来。
sendMsg() 函数用于给后端发送消息,将数据发送到 /app/msg ,这个地址分为两部分,/app 是配置类中配置的前缀,/msg 是消息处理类上标明的映射地址(由后端的 MyMessageCtrl.sendMsg() 方法接收处理)。
src/main/webapp/index.html :
1
2
3
4
5
6
7
8
9
10
11
12
13
14
15
16
17
18
19
20
21
22
23
24
25
26
27
28
29
30
31
32
33
34
35
36
37
38
39
40
41
42
43
44
45
46
47
48
49
50
51
52
53
54
55
56
57
58
59
60
61
62
63
64
65
66
67
68
69
70
71
72
73
74
75
76
77
78
79
80
81
82
83
84
85
86
87
88
89
90
91
92
93
94
95
96
97
98
99
100
101
102
103
| <!DOCTYPE html>
<html lang="en">
<head>
<meta charset="UTF-8">
<title>Websocket demo</title>
<script src="https://cdn.bootcdn.net/ajax/libs/jquery/3.5.1/jquery.min.js"></script>
<script src="https://cdn.bootcdn.net/ajax/libs/sockjs-client/1.5.0/sockjs.min.js"></script>
<script src="https://cdn.bootcdn.net/ajax/libs/stomp.js/2.3.3/stomp.min.js"></script>
</head>
<body>
<div>
<div>
<form>
<button id="connect">连接</button>
<button id="disconnect">断开</button>
</form>
</div>
<div>
<form>
<div>
名称:<input id="name" type="text" name="name"/>
</div>
<div>
信息:<input id = "msg" type="text"/>
</div>
<div>
<button id="send" type="submit">发送</button>
</div>
</form>
</div>
<div>
<table>
<thead>
<tr>
<th>消息</th>
</tr>
</thead>
<tbody id="msg-content">
</tbody>
</table>
</div>
</div>
<script>
var stompClient = null;
function connect() {
console.log("start connecting ..");
var socket = new SockJS('/websocket/tracker');
stompClient = Stomp.over(socket);
stompClient.connect({}, function (frame) {
setConnected(true);
console.log('Connected: ' + frame);
stompClient.subscribe('/topic/response', function (greeting) {
showMsg(JSON.parse(greeting.body).content);
});
});
}
function setConnected(connected) {
$("#connect").prop("disabled", connected);
$("#disconnect").prop("disabled", !connected);
if (connected) {
$("#conversation").show();
}
else {
$("#conversation").hide();
}
$("#greetings").html("");
}
function disconnect() {
if (stompClient !== null) {
stompClient.disconnect();
}
setConnected(false);
console.log("Disconnected");
}
function sendMsg() {
stompClient.send("/app/msg", {}, JSON.stringify({'name': $("#name").val(),'msg':$("#msg").val()}));
}
function showMsg(message) {
$("#msg-content").append("<tr><td>" + message + "</td></tr>");
}
$(function() {
$("form").on('submit', function (e) {
e.preventDefault();
});
$("#connect").click(function () {
connect();
});
$("#disconnect").click(function () {
disconnect();
});
$("#send").click(function () {
sendMsg();
});
});
</script>
</body>
</html>
|
测试
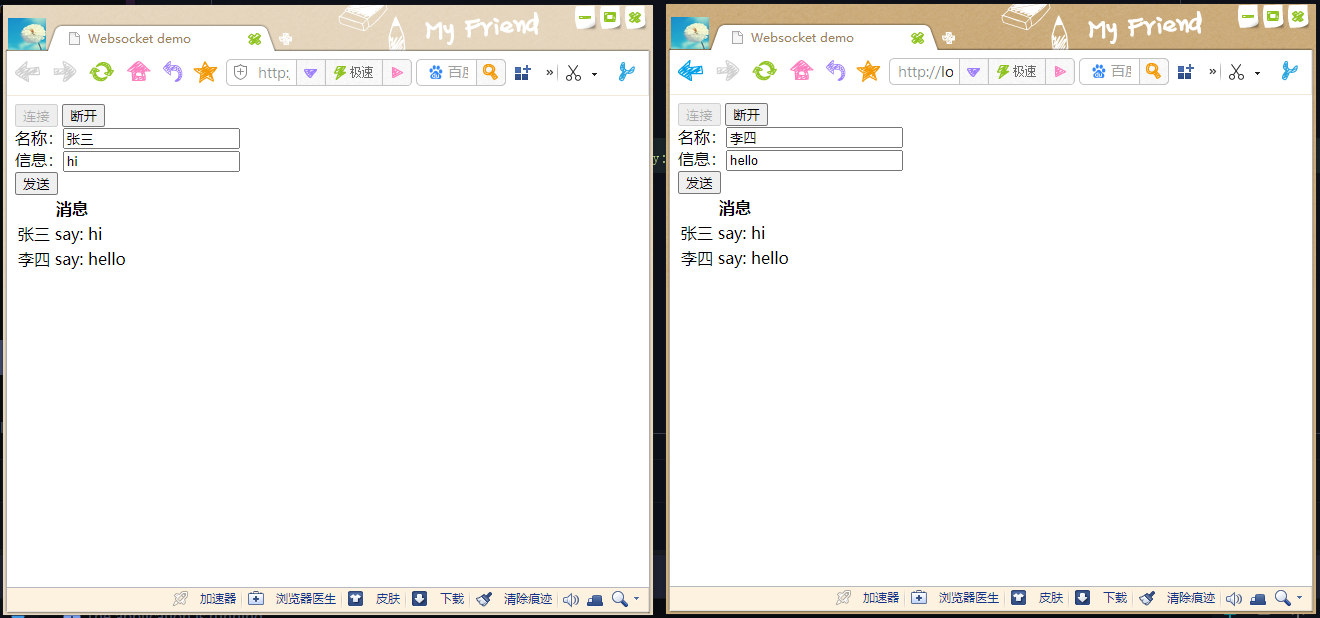
启动项目后,使用浏览器访问项目地址,这里的是 http://localhost:8989 。点击 连接 按钮,与后端建立连接,然后输入名称与消息内容,点击 发送 即可完成消息发送,下方将显示后端推送的消息。可以打开多个页面访问进行测试,这样就形成了一个简易聊天室。
后端主动推送
后端主动推送时,可以注入 SimpMessageSendingOperations 对象,然后使用其中的 convertAndSend 方法将消息发送到指定通道即可。
示例代码:
1
2
3
4
5
6
7
8
9
10
11
12
13
| import org.springframework.beans.factory.annotation.Autowired;
import org.springframework.messaging.simp.SimpMessageSendingOperations;
import org.springframework.stereotype.Service;
@Service
public class MsgService {
@Autowired
private SimpMessageSendingOperations simpMessageSendingOperations;
public void sendMsg(){
simpMessageSendingOperations.convertAndSend("/topic/alarm", "收到一条报警信息");
}
}
|
参考资料
总结
使用 websocket 可以异步处理前端请求,或是实时推送通知消息,还能实现实时聊天功能,还可以实现给指定用户推送消息。